
The Astro PM Gallery is a showcase built into the app: finished images from Astro PM users everywhere, each one carrying the acquisition data behind it – the scope and camera that took it, every filter and sub count, total integration, and where the target sits in the sky. It is the natural last step of a project, and the only part of Astro PM where you see other people’s work.
This page covers browsing the gallery and submitting your own images. For your own submissions and their stats see My Gallery Images; for the featured slot see Image of the Week.
Finding the Gallery #
Open Community → Astro PM Gallery in the left menu. Beneath it sit Image of the Week, the target-type categories, and My Gallery Images.
Categories behave a little differently from the rest of the menu: Nebulae, Galaxies, Stars & Clusters, and Scientific appear only while they actually contain images, so the menu never sends you to an empty page. A blue number beside a category counts images added since you last looked at it – open the category and the badge clears.
The Image Grid #
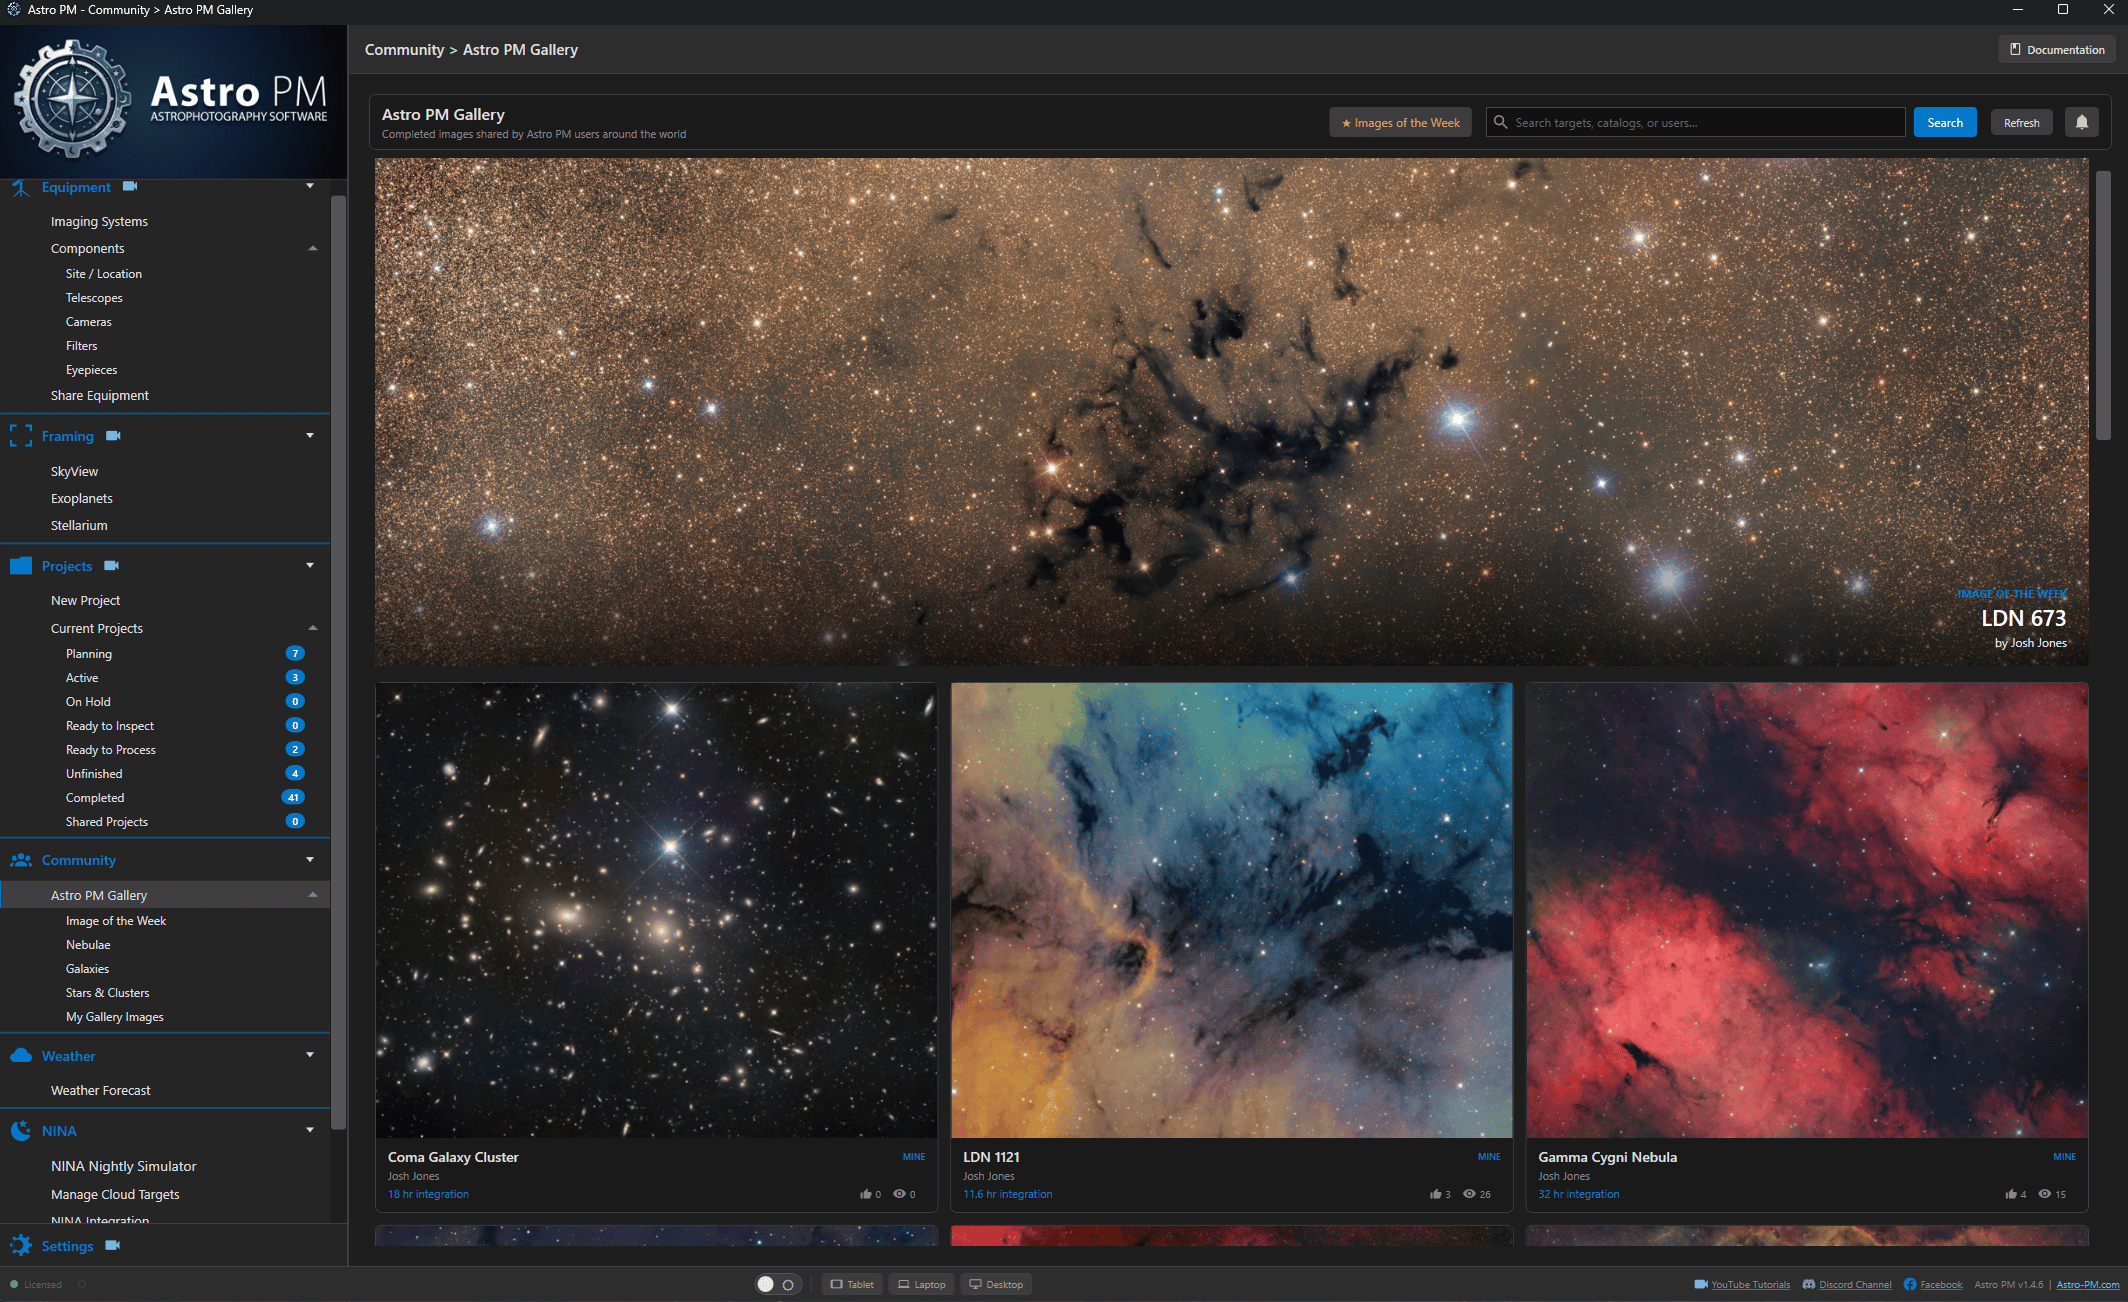
Images are laid out as large tiles – three across, dropping to two on narrower windows and expanding to four on very wide screens – sorted so the gallery always feels current: an image rises to the top when it is newly submitted or newly liked, so active work stays visible rather than sinking by date alone.
Each tile shows the target name, the author, and total integration time. The author name is a link – click it to filter the gallery to everything that user has submitted, with a chip in the toolbar to clear the filter again. There is also a small thumbs-up on the corner of each tile: one click likes the image without opening it, and it turns blue once you have. Your own images show their like and view counts there instead.
The gallery loads twenty images at a time and fetches more as you scroll, so a large gallery costs nothing up front.
Searching #
The search box at the top matches target names, catalog designations, and user names – so “M31”, “NGC 224”, and a photographer’s name all work. Results update as you type, or press Enter. Search combines with the category you are in, and the Refresh button reloads at any time.
Opening an Image #
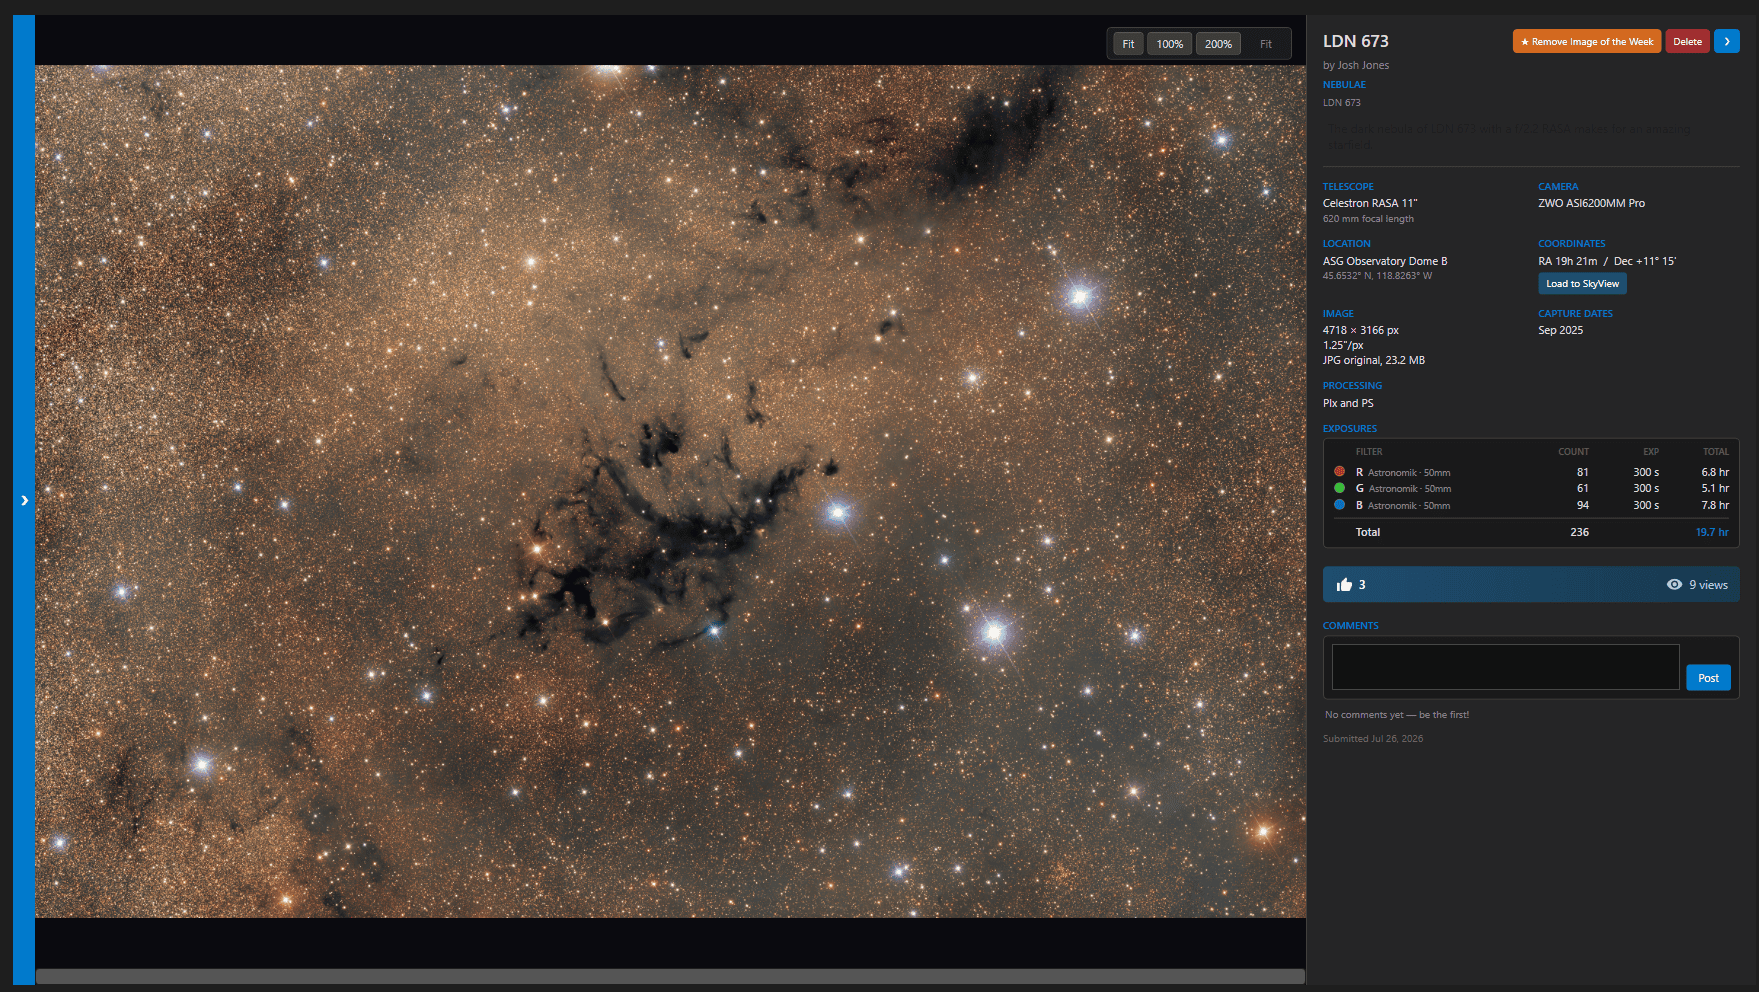
Click a tile and the image detail slides in over the gallery. The picture gets the full panel with proper zoom controls – Fit, 100%, and 200% buttons, mouse-wheel zoom centred on the pointer, and click-drag panning. The web-sized version paints immediately and the full-resolution original loads in behind it, so zooming to 100% shows real pixels rather than an upscale.
The panel on the right carries the acquisition story:
- Telescope and Camera as make and model, with effective focal length
- Location with coordinates, and the target’s RA/Dec plus a Load to SkyView button that drops the same target into your own framing view
- Image details – resolution, pixel scale, original format and size
- Exposures – a table of every filter with its manufacturer and size, sub count, exposure length, and per-filter total, followed by the grand total
- Capture dates and processing software
Close it with the blue arrow button by the title, the blue strip down the left edge, or the Esc key.
Likes, Views, and Comments #
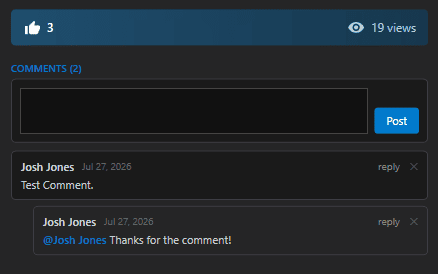
Below the metadata sits a bar with the image’s thumbs-up count and view count. Anyone can like an image – from the tile in the grid or from this bar – and clicking again removes it. Views are counted once per person, and an owner looking at their own image is never counted.
Underneath is the comment thread. Anyone can leave a comment, and anyone can reply – the reply box opens directly beneath the comment being answered so it is clear who you are talking to. Threads only ever indent one level: a reply to a reply is shown at the same depth with an @name prefix, so long conversations stay readable instead of marching off the right edge.
You can remove your own comments at any time. The image owner can give any comment a thumbs-up, which shows as a small gold marker next to that commenter’s name – a nice way to acknowledge good feedback.
Submitting an Image #
Submissions come from a project, which is what lets Astro PM fill in the acquisition data for you. You need two things:
- A saved project – the gallery reads its equipment, exposures, and coordinates.
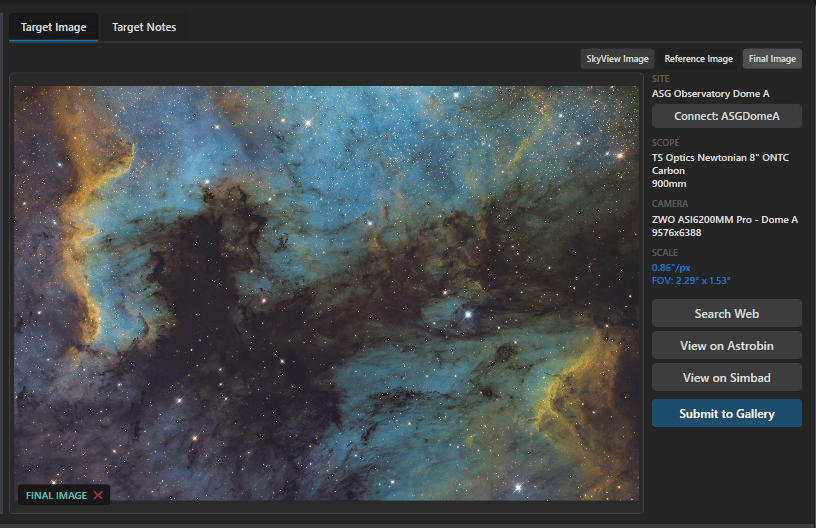
- A final processed image attached to that project – set it on the Target Image tab using the Final Image view, then browse, paste, or drag and drop your processed file onto it.
The image must be a JPG, PNG, or TIFF up to 30 MB. Astro PM checks the actual file contents rather than trusting the extension, so a renamed file still works.
With those in place, click Submit to Gallery in the buttons beside the target image.
The Submission Form #
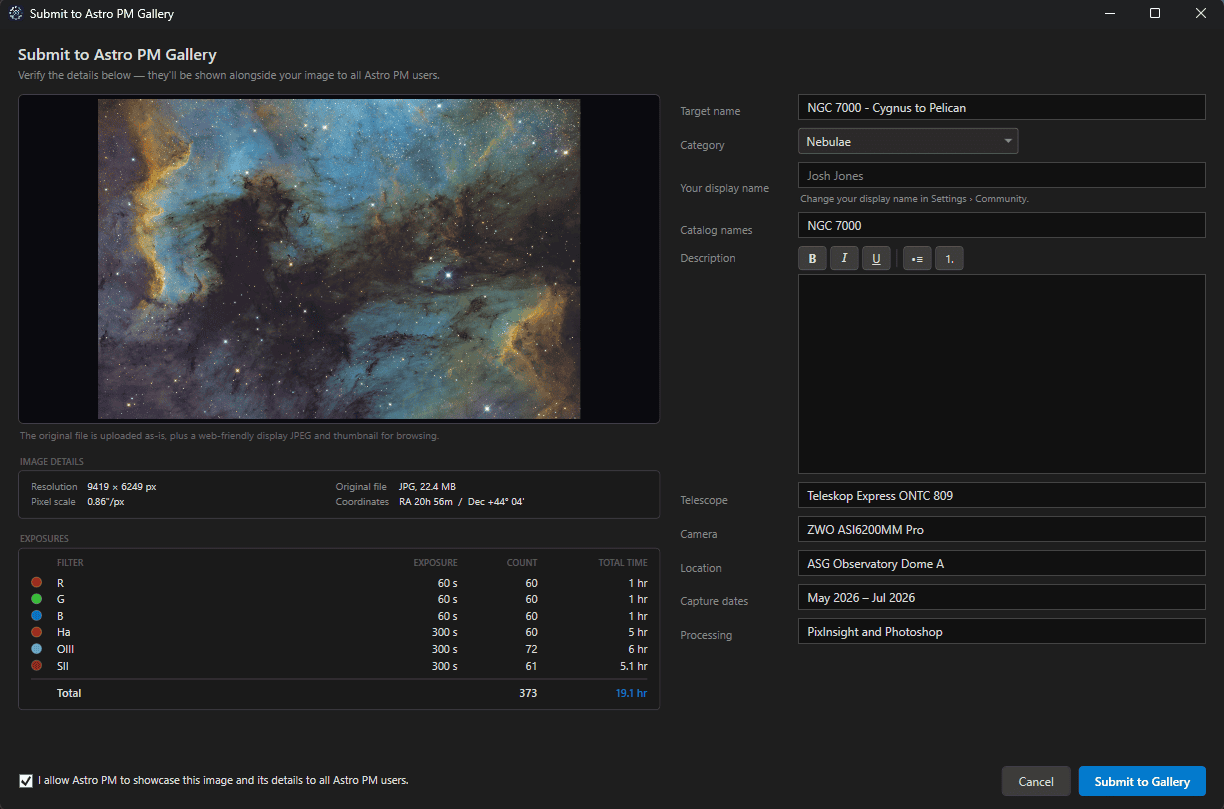
Everything the gallery will show is presented for review before anything is uploaded. The left side previews your image with its resolution, file size, pixel scale, and coordinates, and below it the exposure table read straight from your project – each filter with a colour dot, sub count, exposure length, and total time, in the same order as your project’s exposure lines.
On the right, edit anything that should read differently in public:
- Target name and category – the category is guessed from your target type and can be changed.
- Display name – your name across the whole community. You choose it once on your first submission; after that it is shown read-only here and changed in Settings → Community. Names are unique, so you will be told if the one you want is taken.
- Catalog names, description (with bold, italic, bullets, and numbering), telescope, camera, location, capture dates, and processing software. Equipment is pre-filled with make and model from your library.
Finally, tick the box confirming you are happy for Astro PM to showcase the image to all users – the Submit button stays disabled until you do. A progress bar reports the upload in megabytes, and when it finishes the button simply becomes Close.
What Gets Uploaded #
Three versions of your image travel up: the full-resolution original exactly as you saved it, a web-sized version for fast browsing, and a thumbnail for the grid. Viewers get the small ones while browsing and the original only when they open your image, so the gallery stays quick without ever showing a degraded version of your work.