
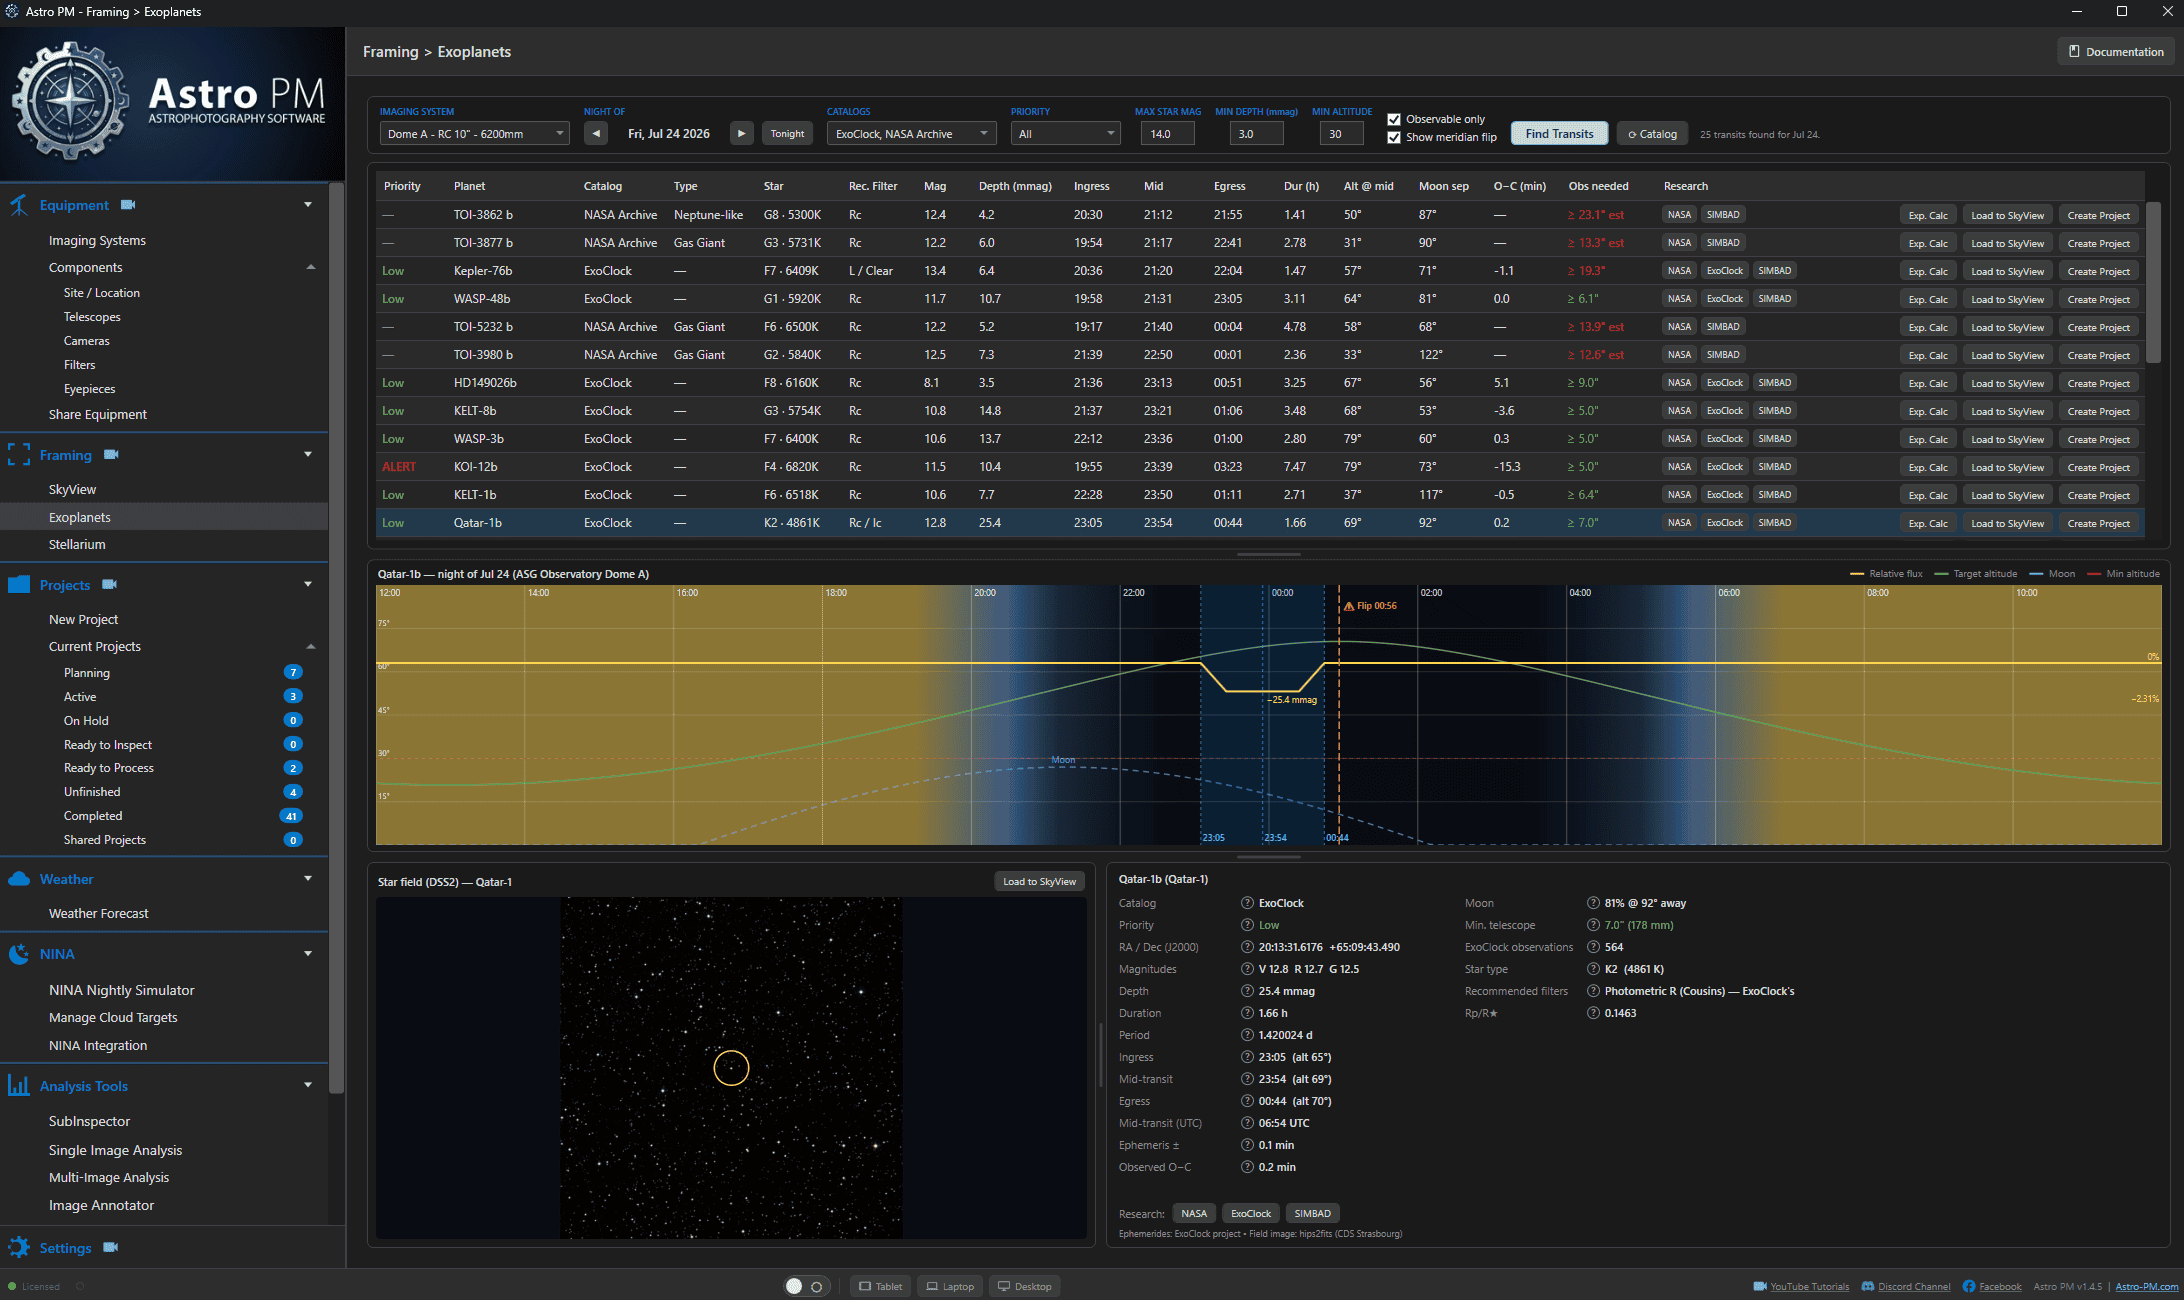
The Exoplanet Targets panel (Framing > Exoplanet Targets) is a complete transit-observation planner built into Astro PM. It predicts which exoplanet transits are observable from your site on any chosen night, draws each event on a noon-to-noon timeline with the predicted light curve, shows the host star’s actual field, and hands the target off to the SkyView framing workflow, the Exposure Calculator, or a ready-to-fill new project – one click each. Every prediction is computed inside the app from published ephemerides; no external website is needed.
Pick a Rig and a Night #
The toolbar starts with the two choices everything else depends on:
- Imaging System – a saved rig from Equipment > Imaging Systems. Its site sets your latitude, longitude, and time zone (all times in the panel are site-local); its telescope aperture powers the color-coded “Obs needed” column; and the scope + camera ride along when you hand a target to the Exposure Calculator or SkyView.
- Night Of – step nights with the arrow buttons or jump back with Tonight. A “night” runs from local noon to the next noon, so a transit at 2 AM stays on the evening you actually set up for.
Press Find Transits to compute the list. ↻ Catalog forces a fresh catalog download; otherwise cached data is used (see below). All selections and filter values persist between sessions.
Three Catalogs #
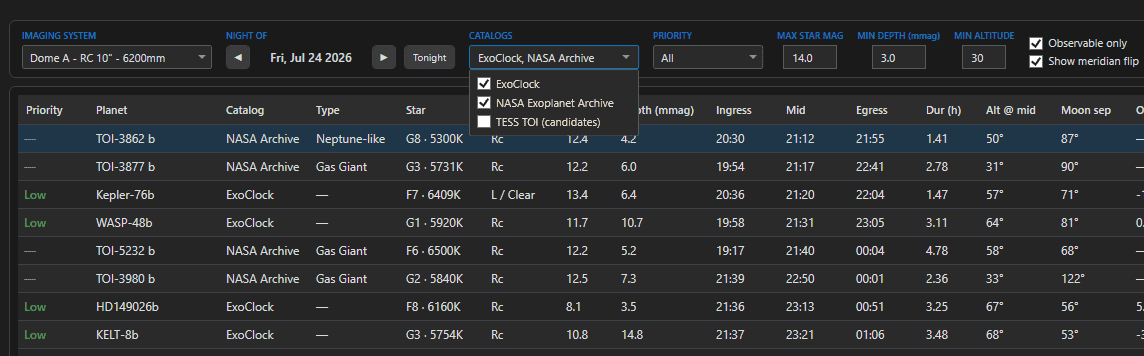
The CATALOGS dropdown selects which planet databases feed the search:
| Catalog | What it is | Cache |
|---|---|---|
| ExoClock | ~750 curated transiting planets with maintained ephemerides, R-band depths, and observation priorities, from the ESA Ariel mission’s ground-support project. The best-quality data – checked by default. | 1 day |
| NASA Exoplanet Archive | All ~4,700 confirmed transiting planets (the pscomppars table, via the archive’s TAP service). Broadest coverage; some ephemerides are older. | 7 days |
| TESS TOI | TESS Objects of Interest with PC (candidate), CP (confirmed), or KP (known planet) dispositions. Mostly unvetted candidates whose ephemerides can drift – for advanced follow-up work. | 7 days |
When the same planet appears in more than one selected catalog it is kept once – the best-curated source wins (ExoClock first, then NASA Archive, then TOI). Catalogs are cached on disk, and if a refresh fails offline the panel quietly falls back to the cached copy.
Filters #
- Priority – ExoClock’s observation priority (All / Alert only / High & up / Medium & up). ALERT and High targets have drifting or poorly constrained ephemerides and need new timing measurements the most.
- Max Star Mag (default 14.0) – faintest host star to include, using V magnitude when available, else R / Gaia G / TESS T.
- Min Depth (default 3 mmag) – shallowest transit to include. 10 mmag is roughly a 0.9% flux drop.
- Min Altitude (default 30°) – minimum target altitude at mid-transit.
- Observable only – keeps only events whose mid-transit happens in darkness (Sun below -6°) and above your minimum altitude.
- Show meridian flip – toggles the flip markers on the timeline (see below).
Reading the Results #
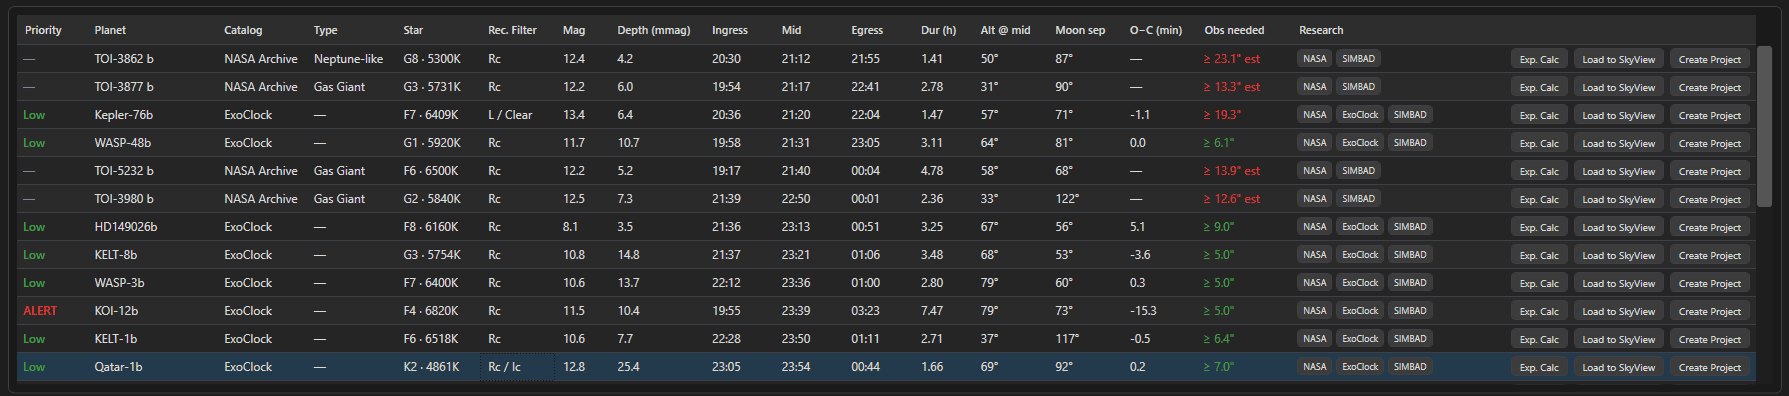
Each row is one transit event, sorted by mid-transit time (every column is sortable):
- Priority – ExoClock priority, color-coded: ALERT red, High orange, Medium gold.
- Planet / Catalog / Type / Star – the planet, its source catalog (TOI rows include the disposition), a size class from the planet’s radius (Terrestrial < 1.25 R⊕, Super-Earth < 2, Sub-Neptune < 4, Neptune-like < 6, Gas Giant above), and the host star’s spectral class estimated from its temperature.
- Rec. Filter – the suggested photometric filter (see the capture section below).
- Mag / Depth / Dur – host star brightness, transit depth in millimagnitudes, and total duration in hours.
- Ingress / Mid / Egress – first contact, transit center, and last contact in site-local time.
- Alt @ mid / Moon sep – target altitude at mid-transit and angular distance from the Moon.
- O−C (min) – ExoClock’s observed-minus-calculated drift: how late (+) or early (−) recent transits arrived versus the ephemeris. A large value means tonight’s event may shift by a similar amount.
- Obs needed – the minimum telescope aperture for a solid detection, from ExoClock’s published noise model (Kokori et al. 2023). Color-coded against your selected rig: green = your scope meets it, gold = within 80% (borderline), red = under-aperture. Values marked “est” are computed by Astro PM for non-ExoClock catalogs.
- Research – one-click pages for the target: NASA’s exoplanet catalog (or ExoFOP for TOI candidates), ExoClock, and SIMBAD.
How the Predictions Are Computed #
Mid-transit times follow the ephemeris T = T₀ + n·P, published in BJD_TDB – barycentric dynamical time at the solar-system barycenter. Astro PM converts each event to your site’s clock, including the barycentric light-travel (Rømer) correction, which alone can move a prediction by up to ±8.3 minutes depending on where Earth is in its orbit relative to the target. This is why a naive UTC conversion of published numbers can look “wrong” – and why the panel agrees with dedicated services like ExoClock’s own predictor.
The details panel also shows Ephemeris ± – the 1σ prediction uncertainty, which grows with every orbit elapsed since the ephemeris epoch (σ ≈ |n|·σ_P + σ_T₀). Pad your observing window by at least this much on both sides, plus any reported O−C drift.
The Transit Timeline #
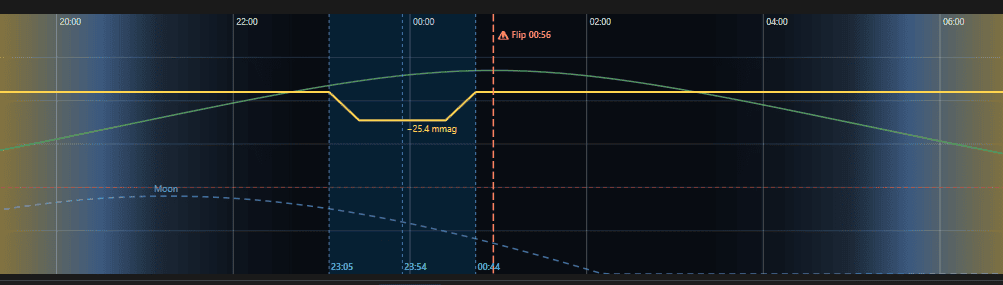
Selecting a row draws the night on the timeline canvas:
- Twilight bands – the noon-to-noon background shades through dusk to astronomical darkness and back, in the same palette as the SkyView timeline, with hour ticks every 2 hours.
- Altitude curves – the target’s altitude in green against 15° gridlines, your minimum altitude as a dashed red line, and the Moon as a dashed pale-blue curve labeled at its peak.
- The transit itself – a blue band from ingress to egress with dashed markers and local times at first contact, mid-transit, and last contact.
- Predicted light curve – a gold trapezoid over the transit window. The dip depth is display-scaled (a real millimagnitude dip would be invisible), but the shape is real: the flat-bottom fraction comes from the catalog geometry (Rp/R★, a/R★, inclination), so a grazing transit correctly shows a V shape with no flat bottom. The right edge labels the true flux drop in percent.
- Meridian flip markers – a dashed line wherever the target crosses the upper meridian, where a German equatorial mount must flip. Orange means the flip lands elsewhere in the night; red means it lands inside the transit – an interruption right through your light curve. Pick a different night, or plan the flip carefully.
Star Field & Target Details #
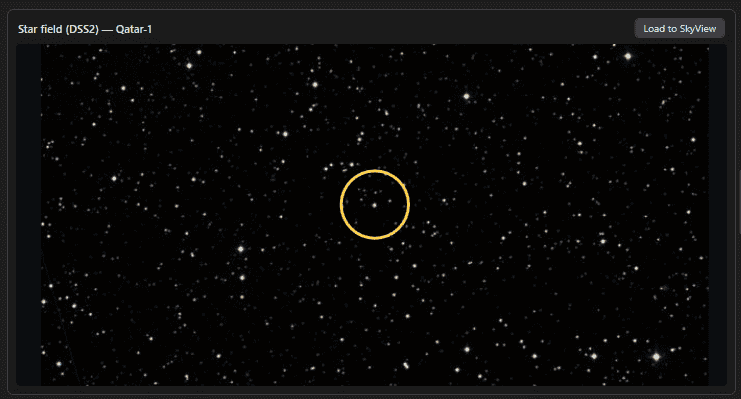
The bottom-left panel shows a real DSS2 color image of the half-degree field around the host star (fetched from the CDS hips2fits service and cached), with a crosshair marking the star – useful for recognizing the field and spotting nearby comparison stars. Load to SkyView opens the same field in the planetarium with your rig’s field of view drawn on it.
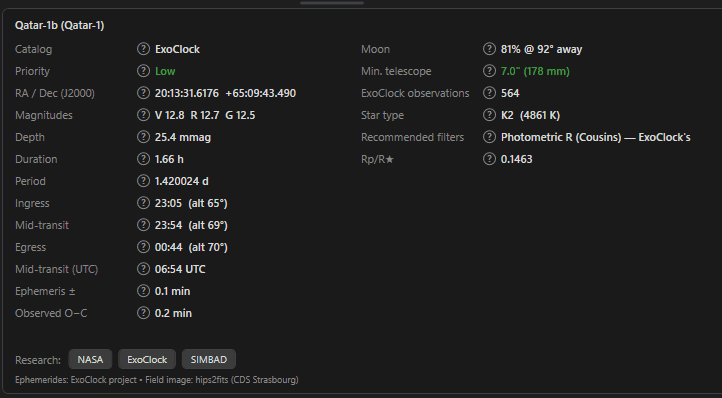
The details panel lists everything the catalogs know about the event: coordinates, magnitudes, depth, duration, period, contact times with altitudes, ephemeris uncertainty, Moon interference, minimum aperture, star type, and the planet-to-star radius ratio. Every row has a ? help glyph with a plain-language explanation of the quantity – transit depth ≈ (Rp/R★)², what a TOI disposition means, why O−C matters, and so on. The panel doubles as a field guide.
From Planning to Capture #
Three actions on every results row take you from “that one” to imaging:
- Exp. Calc – opens the Exposure Calculator in its exoplanet (point-source) mode, preloaded with the star’s magnitude, spectral class, your rig, and the altitude at mid-transit. Photometry lives or dies on keeping the host star well below saturation; the calculator targets a percentage of full well for you.
- Load to SkyView – frames the host star with your imaging system’s FOV for composition and comparison-star placement.
- Create Project – opens the New Project panel prefilled with the star’s name, coordinates, and a description block carrying the catalog data (period, depth, duration, magnitudes, priority, suggested aperture) so the science context stays with the project.
Filter choice: transits are broadband work – the star dims equally at all wavelengths, so narrowband filters just throw away photons. ExoClock’s standard is photometric R (Cousins), which matches their depths and suffers less scintillation and moonlight than B/V. On very red stars Ic also works well; for faint hosts (> mag 13) use Luminance/Clear to maximize signal. From an LRGB imaging set, Red is a good stand-in for Rc.
Observing Tips #
- Record at least an hour of out-of-transit baseline before and after the event so the light curve has a clean reference level on both sides.
- Pad the window by the Ephemeris ± value (and any O−C drift) on both sides – old ephemerides arrive early or late.
- Check the flip marker before committing: a red flip line mid-transit is the most common way a good night goes wrong on a GEM.
- A bright Moon near the target raises sky background and hurts precision; more than ~30° of separation is comfortable for bright hosts.
- High-priority ExoClock targets with few existing observations are where a backyard telescope contributes real science – consider submitting your light curves to exoclock.space.